
Quartz 是一个功能强大的作业调度工具,相当于数据库中的 Job、Windows 的计划任务、Unix/Linux 下的 Cron,但 Quartz 可以把排程控制的更精细。也许大多数人听说 Quartz 是在学习或使用 Spring 的时候,也就是 Spring 整合了Quartz。由于项目中使用了Quartz来实现定时通过接口请求数据的功能,这几天自己查阅资料学习Quartz,在此记录一下。现在分三个步骤演示一下Quartz的使用:在控制台使用Quartz、整合Spring与Quartz、将Quartz任务信息持久化到数据库中。
我的开发环境:Eclipse3.6+jdk1.6.0_26+Tomcat6.0.20,现在Quartz最新版本是2.0.2,下载地址 http://quartz-scheduler.org/downloads/catalog。创建一个Web应用程序,将Quartz2.0.2解压后lib文件夹下的jar包(quartz依赖的包)以及quartz-2.0.2.jar和quartz-oracle-2.0.2.jar(支持Oracle的)拷贝到WEB-INF/lib下,这样即完成示例的准备工作。
一、在控制台使用Quartz
首先创建一个简单的Job,ExampleJob.java代码如下:
- package com.petrochina.job;
- import org.quartz.Job;
- import org.quartz.JobDataMap;
- import org.quartz.JobExecutionContext;
- import org.quartz.JobExecutionException;
- import org.slf4j.Logger;
- import org.slf4j.LoggerFactory;
- public class ExampleJob implements Job {
- private Logger logger = LoggerFactory.getLogger(ExampleJob.class);
- @Override
- public void execute(JobExecutionContext context) throws JobExecutionException {
- System.out.print("I can count to 10 ->");
- // 输出1-10
- for (int i = 1; i <= 10; i++) {
- System.out.print(" | " + i + " ");
- try {
- Thread.sleep(1000);
- } catch (InterruptedException ie) {
- }
- }
- System.out.println("<- See I did it.");
- JobDataMap properties = context.getJobDetail().getJobDataMap();
- System.out.println("Previous Fire Time: " + context.getPreviousFireTime());// 上次执行时间
- System.out.println("Current Fire Time: " + context.getFireTime());// 本次执行时间
- System.out.println("Next Fire Time: " + context.getNextFireTime());// 下一次执行时间
- }
- }
控制台程序如下:
- package com.petrochina.job;
- import static org.quartz.JobBuilder.newJob;
- import static org.quartz.SimpleScheduleBuilder.simpleSchedule;
- import static org.quartz.TriggerBuilder.newTrigger;
- import java.util.Date;
- import org.quartz.JobDetail;
- import org.quartz.Scheduler;
- import org.quartz.SchedulerException;
- import org.quartz.SchedulerFactory;
- import org.quartz.SchedulerMetaData;
- import org.quartz.Trigger;
- import org.quartz.impl.StdSchedulerFactory;
- public class Console {
- public static void main(String[] args) {
- try {
- testJob();
- } catch (Exception e) {
- e.printStackTrace();
- }
- }
- // 测试使用quartz实现的调度任务
- public static void testJob() throws SchedulerException, InterruptedException {
- // 创建调度者工厂
- SchedulerFactory sfc = new StdSchedulerFactory();
- // 通过工厂创建一个调度者
- Scheduler scheduler = sfc.getScheduler();
- /*//----------Quartz1.8.4的写法---------------//
- // 创建一个任务,命名“myjob”,组名“group1”,对应工作类“ExampleJob”
- JobDetail myJob = new JobDetail("myjob", "group1", ExampleJob.class);
- // 使用触发器工具类创建一个每隔15秒执行一次的触发器
- Trigger trigger = TriggerUtils.makeSecondlyTrigger(15);
- trigger.setName("mytrigger");
- trigger.setStartTime(new Date());
- */
- //----------Quartz 2.0.2的写法---------------//
- JobDetail myJob = newJob(ExampleJob.class).withIdentity("myJob", "job-group").build();
- Trigger trigger = newTrigger().withIdentity("mytrigger", "trigger-group").startAt(new Date())
- .withSchedule(simpleSchedule().withIntervalInSeconds(15).repeatForever()).build();nbsp; // 调度任务
- Date startDate = scheduler.scheduleJob(myJob, trigger);
- System.out.println(myJob.getKey() + " will start at:" + startDate.toLocaleString());
- // 开始运行调度程序
- scheduler.start(); Thread.sleep(20000);// 等待20秒
- scheduler.shutdown();// 关闭调度程序 SchedulerMetaData metaData = scheduler.getMetaData();
- System.out.println("Executed " + metaData.getNumberOfJobsExecuted() + " jobs.");
- System.out.println("Test end------>"); }}
执行结果如下:
job-group.myJob will start at:2011-9-2 15:15:02
2011-09-02 15:15:02,046 [main] INFO [org.quartz.core.QuartzScheduler] - Scheduler DefaultQuartzScheduler_$_NON_CLUSTERED started.
I can count to 10 -> | 1 | 2 | 3 | 4 | 5 | 6 | 7 | 8 | 9 | 10 <- See I did it.
Previous Fire Time: null
Current Fire Time: Fri Sep 02 15:15:02 CST 2011
Next Fire Time: Fri Sep 02 15:15:17 CST 2011
I can count to 10 -> | 1 | 2 | 3 | 4 | 5 | 6 2011-09-02 15:15:22,046 [main] INFO [org.quartz.core.QuartzScheduler] - Scheduler DefaultQuartzScheduler_$_NON_CLUSTERED shutting down. //sleep20秒后关闭调度程序
2011-09-02 15:15:22,046 [main] INFO [org.quartz.core.QuartzScheduler] - Scheduler DefaultQuartzScheduler_$_NON_CLUSTERED paused.
| 7 | 8 | 9 | 10 <- See I did it. //已经启动的Job继续执行完成
Previous Fire Time: Fri Sep 02 15:15:02 CST 2011
Current Fire Time: Fri Sep 02 15:15:17 CST 2011
Next Fire Time: Fri Sep 02 15:15:32 CST 2011
2011-09-02 15:15:27,031 [main] INFO [org.quartz.core.QuartzScheduler] - Scheduler DefaultQuartzScheduler_$_NON_CLUSTERED shutdown complete.
Executed 2 jobs.
Test end------>
二、整合Spring与Quartz
spring增加了对Quartz的支持,可以方便的在spring中配置调度程序,而不需要编写代码。首先要添加spring的支持:可以到官网http://www.springsource.org/download下载spring 的jar包,我使用的是3.0.5.RELEASE版本的,将下面的jar包拷贝到WEB-INF/lib下,同时这里的Quartz要使用1.8.5及其以下版本,而不能使用2.0.2版,原因后面讲。
commons-logging.jar
spring-core-3.0.5.RELEASE.jar
spring-beans-3.0.5.RELEASE.jar
spring-context-3.0.5.RELEASE.jar
spring-context-support-3.0.5.RELEASE.jar
spring-asm-3.0.5.RELEASE.jar
spring-expression-3.0.5.RELEASE.jar
spring.transaction-3.0.5.RELEASE.jar
spring-web-3.0.5.RELEASE.jar
添加spring配置文件applicationContext.xml
- <!-- 配置调度程序quartz ,其中配置JobDetail有两种方式 -->
- <!--方式一:使用JobDetailBean,任务类必须实现Job接口
- <bean id="myjob" class="org.springframework.scheduling.quartz.JobDetailBean">
- <property name="name" value="exampleJob"></property>
- <property name="group" value="group1"></property>
- <property name="jobClass" value="com.petrochina.job.ExampleJob"></property>
- </bean> -->
- <!-- 方式二:使用MethodInvokingJobDetailFactoryBean,任务类可以不实现Job接口,通过targetMethod指定调用方法-->
- <bean id="exampleJob" class="com.petrochina.job.ExampleJob2"></bean>
- <bean id="myjob" class="org.springframework.scheduling.quartz.MethodInvokingJobDetailFactoryBean">
- <property name="targetObject" ref="exampleJob"/>
- <property name="targetMethod" value="execute"/>
- <property name="concurrent" value="false"/>
- </bean>
- <!-- 定义名为mytrigger的触发器 -->
- <bean id="mytrigger" class="org.springframework.scheduling.quartz.CronTriggerBean">
- <property name="jobDetail" ref="myjob"/>
- <property name="cronExpression">
- <value>0/15 * * * * ? </value>
- </property>
- </bean>
- <!-- 定义调度器 -->
- <bean id="myscheduler" class="org.springframework.scheduling.quartz.SchedulerFactoryBean" lazy-init="false" autowire="no">
- <property name="triggers">
- <list>
- <ref bean="mytrigger"/>
- </list>
- </property>
- <property name="quartzProperties">
- <props>
- <prop key="org.quartz.threadPool.threadCount">1</prop>
- </props>
- </property>
- </bean>
说明:在spring中配置JobDetail有两种方式,第一种是使用org.springframework.scheduling.quartz.JobDetailBean,这种方式ExampleJob要实现Job接口;第二种是使用org.springframework.scheduling.quartz.MethodInvokingJobDetailFactoryBean调用指定类的指定方法,这个比较灵活,这种方式下ExampleJob2的代码如下:
- package com.petrochina.job;
- public class ExampleJob2 {
- public void execute() {
- System.out.print("I can count to 10 ->");
- for (int i = 1; i <= 10; i++) {
- System.out.print(" | " + i + " ");
- try {
- Thread.sleep(1000);
- } catch (InterruptedException ie) {
- }
- }
- System.out.println("<- See I did it.");
- }
- }
这样只要启动spring容器即可启动调度程序。
1、使用方法testJob启动spring容器
- public static void testJob() throws InterruptedException, SchedulerException {
- // 方法一:基于spring配置job、trigger、scheduler之间的关联关系
- ApplicationContext context = new ClassPathXmlApplicationContext("applicationContext.xml");
- Scheduler scheduler = (Scheduler) context.getBean("myscheduler");
- Thread.sleep(20000);// 等待20秒
- scheduler.shutdown();// 关闭调度程序
- SchedulerMetaData metaData = scheduler.getMetaData();
- System.out.println("Executed " + metaData.getNumberOfJobsExecuted() + " jobs.");
- }
结果如下:
2011-09-02 16:52:27,203 [main] INFO [org.quartz.impl.StdSchedulerFactory] - Quartz scheduler 'myscheduler' initialized from an externally provided properties instance.
2011-09-02 16:52:27,203 [main] INFO [org.quartz.impl.StdSchedulerFactory] - Quartz scheduler version:1.8.5
2011-09-02 16:52:27,203 [main] INFO [org.quartz.core.QuartzScheduler] - JobFactory set to:org.springframework.scheduling.quartz.AdaptableJobFactory@bf7190
2011-09-02 16:52:27,203 [main] INFO [org.springframework.context.support.DefaultLifecycleProcessor] - Starting beans in phase 2147483647
2011-09-02 16:52:27,203 [main] INFO [org.springframework.scheduling.quartz.SchedulerFactoryBean] - Starting Quartz Scheduler now
2011-09-02 16:52:27,203 [main] INFO [org.quartz.core.QuartzScheduler] - Scheduler myscheduler_$_NON_CLUSTERED started.
I can count to 10 -> | 1 | 2 | 3 | 4 | 5 | 6 | 7 | 8 | 9 | 10 <- See I did it.
I can count to 10 -> | 1 | 2 | 3 2011-09-02 16:52:47,203 [main] INFO [org.quartz.core.QuartzScheduler] - Scheduler myscheduler_$_NON_CLUSTERED shutting down.
2011-09-02 16:52:47,203 [main] INFO [org.quartz.core.QuartzScheduler] - Scheduler myscheduler_$_NON_CLUSTERED paused.
2011-09-02 16:52:47,203 [main] INFO [org.quartz.core.QuartzScheduler] - Scheduler myscheduler_$_NON_CLUSTERED shutdown complete.
Executed 2 jobs.
| 4 | 5 | 6 | 7 | 8 | 9 | 10 <- See I did it.
可见和在控制台编写代码实现的效果一样。
2、在web.xml中添加listener来启动spring容器
- <!-- 配置启动spring容器 -->
- <listener>
- <listener-class>org.springframework.web.context.ContextLoaderListener</listener-class>
- </listener>
注意!!!在做示例的时候发现使用Quartz2.0.2+Spring3.0.5配置的applicationContext运行时会出错:
Caused by: org.springframework.beans.factory.CannotLoadBeanClassException: Error loading class [org.springframework.scheduling.quartz.CronTriggerBean] for bean with name 'mytrigger' defined in class path resource [applicationContext.xml]: problem with class file or dependent class; nested exception is java.lang.IncompatibleClassChangeError: class org.springframework.scheduling.quartz.CronTriggerBean has interface org.quartz.CronTrigger as super class
查看发现spring3.0.5中org.springframework.scheduling.quartz.CronTriggerBean继承了org.quartz.CronTrigger(public class CronTriggerBeanextends CronTrigger),而在quartz2.0.2中org.quartz.CronTrigger是个接口(publicabstract interface CronTrigger extends Trigger),而在quartz1.8.5及1.8.4中org.quartz.CronTrigger是个类(publicclass CronTrigger extends Trigger),从而造成无法在applicationContext中配置触发器。这是spring3.0.5和quartz2.0.2版本不兼容的一个bug。
三、将Quartz任务信息持久化到数据库中
Quartz默认将运行信息存放在内存中,一旦程序重启那么以前的任务信息就会丢失,最保险的方式就是将任务信息持久化到数据库中。这里还是使用Quartz2.0.2+Oracle10g来做示例
1、将解压包里的quartz-oracle-2.0.2.jar以及commons-dbcp-1.3.jar 、commons-pool-1.5.4.jar、ojdbc6-11.1.0.7.0.jar拷贝到WEB-INF/lib下。
2、创建quartz配置文件quartz.properties
- #============================================================================
- # Configure Main Scheduler Properties
- #============================================================================
- org.quartz.scheduler.instanceName = My_Quartz
- org.quartz.scheduler.instanceId = AUTO
- #============================================================================
- # Configure ThreadPool
- #============================================================================
- org.quartz.threadPool.class = org.quartz.simpl.SimpleThreadPool
- org.quartz.threadPool.threadCount = 5
- org.quartz.threadPool.threadPriority = 5
- org.quartz.threadPool.threadsInheritContextClassLoaderOfInitializingThread = true
- #============================================================================
- # Configure JobStore single
- #============================================================================
- #RAM
- #org.quartz.jobStore.class = org.quartz.simpl.RAMJobStore #这是默认的
- #============================================================================
- # Configure JobStore Cluster
- #============================================================================
- org.quartz.jobStore.class = org.quartz.impl.jdbcjobstore.JobStoreTX
- org.quartz.jobStore.driverDelegateClass=org.quartz.impl.jdbcjobstore.oracle.OracleDelegate
- org.quartz.jobStore.tablePrefix = QRTZ_
- #org.quartz.jobStore.misfireThreshold = 60000
- #org.quartz.jobStore.isClustered = true
- #org.quartz.jobStore.clusterCheckinInterval = 15000
- org.quartz.jobStore.dataSource = myDS #指定数据源
- #============================================================================
- # Configure dataSource
- #============================================================================
- #dataSource--myDS
- org.quartz.dataSource.myDS.driver = oracle.jdbc.driver.OracleDriver
- org.quartz.dataSource.myDS.URL = jdbc:oracle:thin:@127.0.0.1:1521:cui
- org.quartz.dataSource.myDS.user = cui
- org.quartz.dataSource.myDS.password = cui
- org.quartz.dataSource.myDS.maxConnections = 10
3、根据quartz-2.0.2\docs\dbTables\tables_oracle.sql在数据库中创建Quartz保存任务信息需要的12张表(针对各种数据库的创建语句都有),注意quartz1.8.5和quartz2.0.2有些表的字段有些差异。
4、使用ContextLoaderListener中初始化的StdSchedulerFactory获取Scheduler来调度Job,这样Job的运行信息就会持久化到数据库。这里我创建一个Listener在程序部署时调度Job,当然你也可以在写一个页面来添加、启动、暂停一个Job。
QuartzListener.java
- import static org.quartz.JobBuilder.newJob;
- import static org.quartz.SimpleScheduleBuilder.simpleSchedule;
- import static org.quartz.TriggerBuilder.newTrigger;
- import java.util.Date;
- import javax.servlet.ServletContextEvent;
- import javax.servlet.ServletContextListener;
- import org.quartz.JobDetail;
- import org.quartz.JobKey;
- import org.quartz.Scheduler;
- import org.quartz.SchedulerException;
- import org.quartz.SimpleTrigger;
- import org.quartz.ee.servlet.QuartzInitializerListener;
- import org.quartz.impl.StdSchedulerFactory;
- public class QuartzListener implements ServletContextListener {
- @Override
- public void contextDestroyed(ServletContextEvent arg0) {
- }
- @Override
- public void contextInitialized(ServletContextEvent arg0) {
- StdSchedulerFactory factory = (StdSchedulerFactory) arg0.getServletContext().getAttribute(QuartzInitializerListener.QUARTZ_FACTORY_KEY);
- Scheduler scheduler = null;
- try {
- scheduler = factory.getScheduler();
- // -----------Quartz2.0.2--------------//
- // 如果不存在名为“myjob”,组名为“group1”的Job,则添加进去
- if (scheduler.getJobDetail(new JobKey("myjob", "group1")) == null) {
- JobDetail myJob = newJob(ExampleJob.class).withIdentity("myjob", "group1").build();
- SimpleTrigger trigger = newTrigger().withIdentity("mytrigger", "trigger-group").startAt(new Date())
- .withSchedule(simpleSchedule().withIntervalInSeconds(15).repeatForever()).build();
- scheduler.scheduleJob(myJob, trigger);
- }
- } catch (SchedulerException e) {
- e.printStackTrace();
- }
- }}
配置web.xml
- <!-- 配置启动spring容器 -->
- <listener>
- <listener-class>org.springframework.web.context.ContextLoaderListener</listener-class>
- </listener>
- <!-- 配置Quartz -->
- <listener>
- <listener-class>org.quartz.ee.servlet.QuartzInitializerListener</listener-class>
- </listener>
- <!-- 使用Quartz调度Job的Listener -->
- <listener>
- <listener-class>com.petrochina.job.QuartzListener</listener-class>
- </listener>
5、将上面applicationContext.xml中使用bean配置的调度程序去掉,因为它是使用org.springframework.scheduling.quartz.SchedulerFactoryBean创建的Scheduler,它配置的调度程序不能持久化入库。启动Tomcat,计数的Job开始工作,查看数据库。
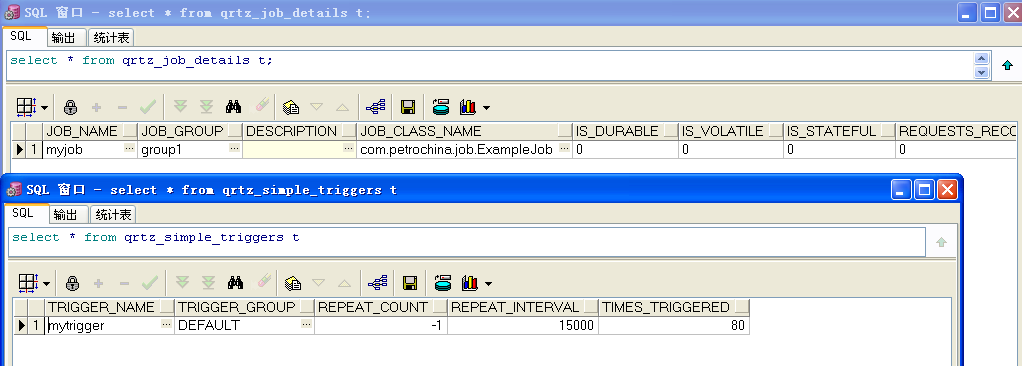
可见,关于Job和Trigger的信息已经入库,但下次程序部署时Quartz会自动还原各个调度程序的状态。
另:Quartz的CronTrigger配置相当灵活,下面贴出一些Cron的资料
格式
A cron expression is a string comprised of 6 or 7 fields separated by white space. Fields can contain any of the allowed values, along with various combinations of the allowed special characters for that field. The fields are as follows:
| Seconds | YES | 0-59 | , - * / |
| Minutes | YES | 0-59 | , - * / |
| Hours | YES | 0-23 | , - * / |
| Day of month | YES | 1-31 | , - * ? / L W |
| Month | YES | 1-12 or JAN-DEC | , - * / |
| Day of week | YES | 1-7 or SUN-SAT | , - * ? / L # |
| Year | NO | empty, 1970-2099 | , - * / |
So cron expressions can be as simple as this: * * * * ? *
or more complex, like this: 0 0/5 14,18,3-39,52 ? JAN,MAR,SEP MON-FRI 2002-2010
样例
Here are some full examples:
| 0 0 12 * * ? | Fire at 12pm (noon) every day |
| 0 15 10 ? * * | Fire at 10:15am every day |
| 0 15 10 * * ? | Fire at 10:15am every day |
| 0 15 10 * * ? * | Fire at 10:15am every day |
| 0 15 10 * * ? 2005 | Fire at 10:15am every day during the year 2005 |
| 0 * 14 * * ? | Fire every minute starting at 2pm and ending at 2:59pm, every day |
| 0 0/5 14 * * ? | Fire every 5 minutes starting at 2pm and ending at 2:55pm, every day |
| 0 0/5 14,18 * * ? | Fire every 5 minutes starting at 2pm and ending at 2:55pm, AND fire every 5 minutes starting at 6pm and ending at 6:55pm, every day |
| 0 0-5 14 * * ? | Fire every minute starting at 2pm and ending at 2:05pm, every day |
| 0 10,44 14 ? 3 WED | Fire at 2:10pm and at 2:44pm every Wednesday in the month of March. |
| 0 15 10 ? * MON-FRI | Fire at 10:15am every Monday, Tuesday, Wednesday, Thursday and Friday |
| 0 15 10 15 * ? | Fire at 10:15am on the 15th day of every month |
| 0 15 10 L * ? | Fire at 10:15am on the last day of every month |
| 0 15 10 ? * 6L | Fire at 10:15am on the last Friday of every month |
| 0 15 10 ? * 6L | Fire at 10:15am on the last Friday of every month |
| 0 15 10 ? * 6L 2002-2005 | Fire at 10:15am on every last friday of every month during the years 2002, 2003, 2004 and 2005 |
| 0 15 10 ? * 6#3 | Fire at 10:15am on the third Friday of every month |
| 0 0 12 1/5 * ? | Fire at 12pm (noon) every 5 days every month, starting on the first day of the month. |
| 0 11 11 11 11 ? | Fire every November 11th at 11:11am. |


相关推荐
在实际项目应用中经常会用到定时任务,可以通过quartz和spring的简单配置即可完成,但如果要改变任务的执行时间、频率,废弃任务等就需要改变配置甚至代码需要重启服务器,这里介绍一下如何通过quartz与spring的组合...
spring多个定时任务quartz配置
NULL 博文链接:https://duanfei.iteye.com/blog/1732839
spring3 配置quartz定时任务的使用。一个小例子。可直接运行Test.java。就可以启动定时任务。每10秒钟执行一次,可以根据自己配置。
spring多个定时任务quartz配置
定时任务demo,Java语言,spring整合quartz配置文件实现定时任务
spring多个定时任务quartz配置 easy518网址导航 http://www.easy518.com
java中spring quartz定时任务demo,里面包含项目所需的quartz.jar, spring.jar包,配置文件等,可直接运行使用
spring-cloud-alibaba+dubbo+nacos+quartz以yml配置方式实现
Spring+Quartz 从数据库中获取定时任务和定时时间,动态实现对定时任务的增删改查,部署到tomcat即可看到定时任务执行效果。本人亲测,可用!
Springboot整合Quartz实现定时任务数据库动态配置,新增任务、修改cron表达式、暂停任务、恢复任务、删除任务等操作
springboot+quartz 动态化配置,可在页面操作,查看、添加、修改、删除,暂停等操作
虽然可以通过属性文件(在属性文件中可以指定 JDBC 事务的数据源、全局作业和/或触发器侦听器、插件、线程池,以及更多)配置 Quartz,但它根本没有与应用程序服务器的上下文或引用集成在一起。结果就是作业不能访问...
spring3 配置quartz定时任务的使用。一个小例子。可直接运行Test.java。就可以启动定时任务。
spring注解Quartz定时执行功能
分享项目中使用到的spring中quartz定时任务文件,其中有quartz.xml demo实例,非常清楚每个步骤和流程,也有配置文件 quartz.properties 详细说明,如有不足之处,请多指教,谢谢!
Spring Quartz如何动态配置时间
Spring Boot 配置 Quartz 定时任务(csdn)————程序
springboot整合Quartz实现动态配置定时任务源码
关于spring中quartz的配置